


Recipe of the Week
-
Found on Disney Family Fun Ingredients 1 cup couscous 1 1/2 cups boiling water 3/4 cup diced zucchini 3/4 cup diced red bell pepper ...
Showing posts with label cookies. Show all posts
Showing posts with label cookies. Show all posts
Nutter Butter Flip Flops
Found on Making Over the Martins
 We covered nutter butter cookies in white candy melts tinted in pastel colors. We used green, blue and pink. Then, using fondant, we made the straps and a little yellow flower.


Clever Clovers
Found on Disney Family Fun

- Ingredients
- waxed paper
- 3 yogurt covered mini pretzels
- 1/4 teaspoon vegetable oil
- 1/4 cup white chocolate chips
- green icing
- decorating sugar
- Instructions
- To make a batch, cover a work surface with a sheet of waxed paper. For each clover, arrange three yogurt-covered mini pretzels and a pretzel section as shown.
- Combine 1/4 teaspoon vegetable oil with 1/4 cup white chocolate chips and melt them together in the microwave according to the chips' package directions. Dab the mixture between the pretzel pieces to adhere them. Let the chocolate harden.
- Working with one clover at a time, pipe the edges and stem with green icing (we used a #8 round piping tip), then quickly sprinkle it with decorating sugar (we used white, light green, and dark green).
- Tips:
- To save sugar, sprinkle each clover on a small piece of waxed paper. After you've covered a few treats, use the paper to funnel the extra sugar back into its jar.
Shamrock Cookies
Found on Kitchen Daily
Ingredients
Directions
In a large mixer bowl beat butter with an electric mixer on medium speed until softened (about 30 seconds). Add sugar and salt and beat until fluffy.
Add the egg, peppermint extract or vanilla, and a few drops of green food coloring. Beat mixture well.
With mixer on low speed gradually add flour to butter mixture and beat well.
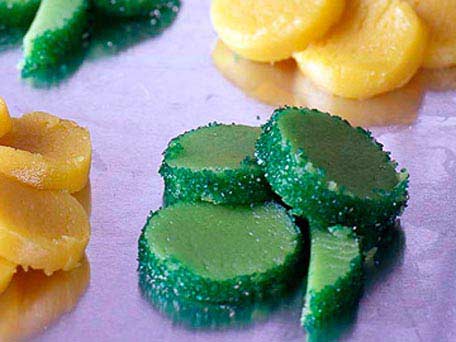
Divide dough into 3 equal parts. Shape each part into a roll about 1 inch thick and about 8 inches long. Roll each in green colored sugar. Wrap rolls in plastic wrap. Chill in refrigerator for at least 2 hours or up to 1 week.
Unwrap rolls. Slice crosswise so the slices are 1/4 inch thick. To shape each shamrock, place 3 slices of dough with sides touching in a shamrock shape on an ungreased cookie sheet. Cut a stem from a fourth slice and attach to the shamrock (save the rest of this slice for cutting other shamrock stems). Gently push the slices together so each leaflet curves in slightly.
Bake in a 350 degree F oven about 8 minutes or until edges are light brown. With a pancake turner lift the cookies onto a cooling rack to cool. Makes 32 cookies.
Make-Ahead Tip: Store the baked cookies in a tightly covered container at room temperature up to 3 days. Or, store the baked cookies in a freezer container in the freezer up to 2 weeks.
Read more: http://www.kitchendaily.com/recipe/shamrock-cookies-143742/#ixzz1GgBGkscX
St. Patrick's Day Cookies: Rainbows, shamrocks and gold
From Amanda's Cooking

3 ounces cream cheese
1 cup white sugar
1 egg
1 teaspoon vanilla extract
2 3/4 cups all-purpose flour
1 teaspoon baking powder
1/4 teaspoon salt
assorted colors of paste food coloring
24 lollipop sticks
Check out her site for the walk through directions! She has each step pictured and makes it SUPER easy!
Head over to AMANDA'S COOKING
Chewy Oatmeal Yogurt Bars
Found on Adventures of a BettyCrocker Wannabe
 3/4 cup firmly packed brown sugar
1/2 cup granulated sugar
1 (8-ounce) carton yogurt (vanilla or fruit flavored)
1 egg, lightly beaten
2 Tbsp vegetable oil
2 Tbsp milk
2 tsp vanilla
1 1/2 cups all-purpose flour
1 tsp baking soda
1 tsp ground cinnamon
1/2 tsp salt
3 cups oats
1 cup add-ins (diced dried fruit, raisins, cranberries, chocolate chips)
1. Heat oven to 350 degrees.
2. In a large bowl, combine sugars, yogurt, egg, oil, milk, and vanilla; mix well. In medium bowl, combine flour, baking soda, cinnamon and salt; mix well. Add to yogurt mixture; mix well. Stir in oats and add-ins of your choice (I used cranberries and chocolate chips; 1/2 cup of each).
3. Spread dough onto bottom of ungreased 9x13 baking pan.
4. Bake 28-30 minutes or until light golden brown. Cool completely on wire rack. Or just do what we do and cut into them as soon as they don't burn your fingers when you touch them.
5. Store tightly covered.
Makes about 24 bars.

1/2 cup granulated sugar
1 (8-ounce) carton yogurt (vanilla or fruit flavored)
1 egg, lightly beaten
2 Tbsp vegetable oil
2 Tbsp milk
2 tsp vanilla
1 1/2 cups all-purpose flour
1 tsp baking soda
1 tsp ground cinnamon
1/2 tsp salt
3 cups oats
1 cup add-ins (diced dried fruit, raisins, cranberries, chocolate chips)
1. Heat oven to 350 degrees.
2. In a large bowl, combine sugars, yogurt, egg, oil, milk, and vanilla; mix well. In medium bowl, combine flour, baking soda, cinnamon and salt; mix well. Add to yogurt mixture; mix well. Stir in oats and add-ins of your choice (I used cranberries and chocolate chips; 1/2 cup of each).
3. Spread dough onto bottom of ungreased 9x13 baking pan.
4. Bake 28-30 minutes or until light golden brown. Cool completely on wire rack. Or just do what we do and cut into them as soon as they don't burn your fingers when you touch them.
5. Store tightly covered.
Makes about 24 bars.
Dark Chocolate Orange Shortbread
Found on TwoPeasandTheirPod


2 sticks of unsalted butter
1 tsp salt
3/4 cup sugar
Zest of 2 oranges (about 3 tablespoons)
1 tsp vanilla
2 1/3 cups flour
1 cup dark chocolate, chopped into tiny pieces
1. Preheat oven to 300 degrees. Grease 2 9 inch cake pans.
2. Place the sugar and orange zest in a bowl. Rub the zest in with your fingers. In the bowl of a mixer, cream together butter, sugar/orange mix, salt, and vanilla.
3. Chop chocolate. You want the pieces a little smaller than chocolate chips.
4. Beat the flour and the chocolate with the butter mixture, until well combined.
5. Divide the dough in half and press in prepared cake pans. Make sure each pan is even. Smooth the surface and prick the dough with a fork.
6. Bake for 40 minutes, until golden brown on the edges. Remove and loosen the edges with a knife.
7. Wait five minutes, then carefully place the shortbread out onto a clean work surface, all in one piece.
8. Using a pizza wheel or knife, cut into wedges. Do this while it is still warm so you can cut it. Transfer wedges to a cooling rack
OREO Cheesecake Bites
Found on Kraft

what you need
36 OREO Cookies, divided
1/2 cup butter or margarine, divided
4 pkg. (8 oz. each) PHILADELPHIA Cream Cheese, softened
1 cup sugar
1 cup BREAKSTONE'S or KNUDSEN Sour Cream
1 tsp. vanilla
4 eggs
4 squares BAKER'S Semi-Sweet Chocolate
make it
HEAT oven to 325°F.
LINE 13x9-inch baking pan with foil, with ends extending over sides. Finely crush 24 cookies. Melt 1/4 cup butter; mix with crumbs. Press onto bottom of prepared pan.
BEAT cream cheese and sugar with mixer until blended. Add sour cream and vanilla; mix well. Add eggs, 1 at a time, beating after each just until blended. Chop remaining cookies. Gently stir into batter; pour over crust.
BAKE 45 min. or until center is almost set. Cool. Meanwhile, microwave chocolate and remaining butter in microwaveable bowl on HIGH 1 min.; stir until smooth. Cool slightly; spread over top of cheesecake. Refrigerate 4 hours. Use foil handles to lift cheesecake from pan before cutting to serve.
kraft kitchens tips
SIZE-WISE
Sweets can be part of a balanced diet but remember to keep tabs on portions.
HOW TO NEATLY CUT DESSERT BARS
When cutting creamy-textured desserts, such as cheesecake, carefully wipe off the knife blade between cuts with a clean damp towel. This prevents the creamy filling from building up on the blade, ensuring clean cuts that leave the edges intact.
HOW TO MAKE MESS-FREE COOKIE CRUMBS
Crushing cookies into crumbs can be a messy task. To keep the mess to a minimum, place the whole cookies in a resealable plastic bag. Flatten bag to remove excess air, then seal bag. Crush the cookies into crumbs by rolling a rolling pin across the bag until the crumbs are as fine as you need.
Watermelon Cookies
Found on Amanda's Cookin'
 Watermelon Cookies
printable version
Sugar Cookie Dough
3 3/4 cups all purpose flour
1 teaspoon baking powder
1/2 teaspoon salt
1 cup cold unsalted butter, cut into 1/2 tablespoon slices
1 1/2 cups granulated sugar
2 eggs
2 teaspoon vanilla extract
6 drops red food coloring
1 cup miniature semi sweet morsels
Glaze
1 1/2 cups powdered sugar, sifted
2-3 tablespoons milk
green paste food coloring OR 15-20 drops green food coloring
In a medium bowl, whisk together flour, baking powder, and salt. Set aside.
Add butter slices, sugar, eggs, vanilla, and red food coloring to your mixer's bowl. Beat on medium speed until incorporated. Don't be concerned if there are small lumps of butter still visible. Turn mixer down to low and gradually add flour mixture. Mix until incorporated and no traces of flour are left. Gather all the dough together using a sturdy rubber spatula.
Remove dough from bowl and separate into two batches. Place one batch between 2 sheets of parchment paper and roll out to about 1/4" thick. Repeat with the other batch. Chill in the refrigerator for two hours.
Preheat oven to 400 degrees F and have insulated baking sheets ready.
*Note: Insulated baking sheets are best for baking sugar cookies. If you only have regular cookie sheets, line them with parchment or a silicon baking mat.

Remove one batch of rolled dough from the refrigerator. Cut out circles with a cookie cutter or biscuit cutter.

Use a dough scraper or a sharp knife to cut each circle in half. Place the halves on the baking sheet, about 1" apart.

Gently press miniature semi sweet morsels into each semicircle.

Bake for 6-8 minutes, checking after 6 minutes (mine were perfect in 7 minutes). Cookies will be slightly puffed but not browned. Do not allow cookies to get too brown or you'll have dry crumbly cookies. Remove from oven and allow cookies to cool on baking sheets for 5 minutes. Remove to wire cooling rack and allow to cool completely.
For each batch of cookie dough, after cutting out the circles, gather the scraps together and reroll them, place back in the refrigerator. Repeat until all dough has been used.
For the Glaze
In a small bowl, mix together all ingredients to form a glaze. You may add drops of milk to thin glaze if it is too thick.
Cover counter with wax paper and place cooling racks over the wax paper to catch drips. To decorate the cookies, roll the round end of the cookie in the glaze, allow excess to drip off into bowl.

Place cookies on cooling racks, excess glaze will drip through onto the wax paper. Wait for glaze to set before moving the cookies.


printable version
Sugar Cookie Dough
3 3/4 cups all purpose flour
1 teaspoon baking powder
1/2 teaspoon salt
1 cup cold unsalted butter, cut into 1/2 tablespoon slices
1 1/2 cups granulated sugar
2 eggs
2 teaspoon vanilla extract
6 drops red food coloring
1 cup miniature semi sweet morsels
Glaze
1 1/2 cups powdered sugar, sifted
2-3 tablespoons milk
green paste food coloring OR 15-20 drops green food coloring
In a medium bowl, whisk together flour, baking powder, and salt. Set aside.
Add butter slices, sugar, eggs, vanilla, and red food coloring to your mixer's bowl. Beat on medium speed until incorporated. Don't be concerned if there are small lumps of butter still visible. Turn mixer down to low and gradually add flour mixture. Mix until incorporated and no traces of flour are left. Gather all the dough together using a sturdy rubber spatula.
Remove dough from bowl and separate into two batches. Place one batch between 2 sheets of parchment paper and roll out to about 1/4" thick. Repeat with the other batch. Chill in the refrigerator for two hours.
Preheat oven to 400 degrees F and have insulated baking sheets ready.
*Note: Insulated baking sheets are best for baking sugar cookies. If you only have regular cookie sheets, line them with parchment or a silicon baking mat.

Remove one batch of rolled dough from the refrigerator. Cut out circles with a cookie cutter or biscuit cutter.

Use a dough scraper or a sharp knife to cut each circle in half. Place the halves on the baking sheet, about 1" apart.

Gently press miniature semi sweet morsels into each semicircle.

Bake for 6-8 minutes, checking after 6 minutes (mine were perfect in 7 minutes). Cookies will be slightly puffed but not browned. Do not allow cookies to get too brown or you'll have dry crumbly cookies. Remove from oven and allow cookies to cool on baking sheets for 5 minutes. Remove to wire cooling rack and allow to cool completely.
For each batch of cookie dough, after cutting out the circles, gather the scraps together and reroll them, place back in the refrigerator. Repeat until all dough has been used.
For the Glaze
In a small bowl, mix together all ingredients to form a glaze. You may add drops of milk to thin glaze if it is too thick.
Cover counter with wax paper and place cooling racks over the wax paper to catch drips. To decorate the cookies, roll the round end of the cookie in the glaze, allow excess to drip off into bowl.

Place cookies on cooling racks, excess glaze will drip through onto the wax paper. Wait for glaze to set before moving the cookies.

Chocolate Covered Monday – Chocolate & Peanut Butter Cookies
Found on Got Chocolate

Here is how to Chocolate cover them


3 Cups flour
1/2 tsp. baking soda
1/4 tsp. salt
1-1/4 Cups brown sugar, firmly packed
1-1/4 Cups white sugar
1 Cup salted butter, softened
3 large eggs
1 Cup creamy or crunchy peanut butter
2 tsp. pure vanilla extract
1/2 tsp. baking soda
1/4 tsp. salt
1-1/4 Cups brown sugar, firmly packed
1-1/4 Cups white sugar
1 Cup salted butter, softened
3 large eggs
1 Cup creamy or crunchy peanut butter
2 tsp. pure vanilla extract
Preheat oven to 325*
In a medium bowl combine flour, baking soda and salt. Mix well with a wire whisk and set aside.
In a large bowl blend sugars using an electric mixer set at medium speed. Add butter and mix to form a grainy paste, scraping the sides of the bowl. Add eggs, peanut butter and vanilla and mix at medium speed until light and fluffy.
Add the flour mixture and mix at low speed until just mixed. Do NOT overmix.
Drop by rounded tablespoons onto an ungreased cookie sheet, 1-1/2 inches apart. Bake for 18-22 minutes or until light brown on the edges. Transfer cookies immediately to a cool surface with a spatula.
Enjoy! These cookies are very good!
Get your DAILY Chocolate fix! Subscribe HERE!Here is how to Chocolate cover them
The ingredients: Chocolate Candy Melts, microwave-safe bowl and a plate or cookie sheet covered with wax paper.
Melt Chocolate in 30 second intervals, stirring each time. Be sure to not overheat, instead melt while some of the Chocolate pieces are still holding their shape and stir until completely melted. Nuke for a few seconds more if needed.
Place one cookie in the Chocolate.
Use a spoon to completely cover the cookie.
Then lift it out.
And shake off the excess Chocolate. This Chocolate was pretty thick so not much fell off. YAY! But if you want the Chocolate thinner, add a teaspoon of Crisco to the Chocolate and heat again for only a few seconds. Again, do NOT overheat the Chocolate or it’ll turn a white-ish color when it dries.
Place cookies on the wax paper.
Yum! Don’t they look delicious?
Place in the refrigerator for 10 minutes or until the Chocolate is set. It doesn’t take long!
Chocolate Covered Peanut Butter Cookies! They look a little like Chocolate covered Oreos or those Girl Scouts Thin Mint Cookies.
Subscribe to:
Posts (Atom)
